Spread Microformats
Inspired by Spread Firefox, this page is for sharing community resources for marketing microformats such as buttons, banners, wallpaper / desktop screens, logo graphics, stickers, t-shirts etc.
- See advocacy-email-samples for some sample emails you can copy/customize and send to site owners to encourage them adopt microformats.
Wallpaper
Wallpaper and desktop screens.
- A wallpaper by Rémi Prévost
Logo
![]()
logo text

- The logo was designed by Dan Cederholm
- High-resolution EPS and transparent PNG versions of the microformats logo text by Dan Cederholm.
- the microformats typeface is Solex Medium by Emigre.
logo mark
- An SVG and PNG (for Fireworks) version, by Rémi Prévost. Released under CC BY-NC-SA.
- An SVG version (and alternative orange colour) by Brian Tremblay. Released under CC0 1.0 Universal (CC0 1.0) Public Domain Dedication.
- Also available (slightly modified) as part of the Super Tiny Web Icons collection. Released under MIT License.
POSH
- POSH logos and buttons
stickers
See the stickers page to easily order a set of moo microformats stickers!
T-Shirts
- See photos of microformats tshirts on Flickr (the clusters are especially fun)
- Note also microformats t-shirt in Second Life
motto ideas
"microformats.org: keeping it classy since 2005"
do it yourself tshirts
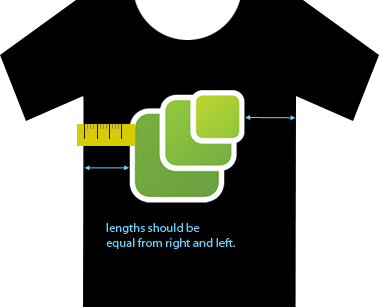
Burcu Dogan has made her own microformats t-shirt:

For those who are not able to find a microformats t-shirt, it is possible to make one at home less than an hour. The requirements for such a pressing process are listed below:
- A high quality microformats logo (which can be found below the Logo headline on this page)
- A black t-shirt
- An iron-on transfer paper for dark t-shirts (note that printers doesn't print white, so there're special papers to print white on dark)
- An iron an a hard surface. (Ironing press with a large surface is highly recommended.)
- A laser printer
- Sharp and sensitive scissors
- Non-metalic heat resisting papers
(Warning: Take the instructions on the transfer paper you bought as the first reference, we're not responsible for unsuccessful attempts. Tips about pressing can change from paper to paper.)
Firstly, you need to print the logo on the transfer paper. Transfer papers for dark t-shirts are sticky backed white papers which vary in size. You need to decide which size you want to press on your t-shirt. A4 and A3 are suitable for microformats t-shirts.
Print the logo with a black background. The result of the paper printed should look like this:

(You can, of course decrease, the amount of background area to save ink)
Now it is time to separate logo from the background. Carefully clip the edges and get the logo all alone. White borders should stay with the green layers, don't make a mistake by clipping them out.
Prepare the iron press, you will need the highest temperature with no stream to transfer successfully. Give your press at least 10 minutes to heat fully. While the iron is heating, decide which position your logo should appear. Use a ruler to check if the logo is positioned symmetrically.
If your iron press is heated, gently peel the tiny paper on the back of the transfer paper to make it sticky. Place it on the t-shirt and put 1 or 2 non-metalic heat resisting paper of any kind on the logo. Be sure that transfer paper doesn't overlap.

Press the iron for 10-15 seconds. This actually depends on the paper you are using, so it is best to follow the instructions on the iron-on transfer paper you purchased. If necessary repress the iron on the whole surface for 5-10 seconds again.
And, you made a new microformats t-shirt! Don't forget to take a picture and share.
Note that you should hand wash your t-shirt and iron it from back carefully. Don't forget that it is also possible to use another fabrics such as bags to print microformats logos. We're waiting for your creations.
External online community resources
Video
- See videos of microformats on YouTube or Vimeo, in particular, a video of a microformats tshirt (photo).
Social networking
Groups for fans and advocates of microformats to join or follow:
- Facebook microformats fan page
- Facebook microformats group
- Flickr microformats group
- microformats on Satisfaction
- microformats on Twitter.
wiki-communities
- Wikipedia: Project Microformats
- meatball:microformats -- a first page (stub to be reviewed) dedicated to have any review/opinion from the meatballers especially on the wiki-formats.
- communitywiki:microformats -- an old multilingual page with a blockcodemachine proposal.